Off-Grid Solar for Beginners: A Practical First System
Start off-grid solar safely with a practical beginner system plan: loads, panels, batteries, inverter choices, and upgrade path.
Most people start thinking about off-grid solar with the same question: “How many panels do I need?” It is the wrong first question, but it is an understandable one. Panels are visible, exciting, and easy to shop for. The quieter truth is that a good solar setup begins with your daily habits: what you want to run, how long you want to run it, and how much backup you need when the weather is not cooperating.
This guide walks you through a sane first solar system for a cabin, tiny home, shed office, camper, or emergency home backup corner. We are not trying to build a whole-house electrical system in one weekend. We are trying to build practical competence: enough power for lights, device charging, a small fridge or cooler, communications, tools in moderation, and a system you can understand well enough to maintain.
The goal is simple: start small, measure honestly, buy components that can grow, and avoid unsafe shortcuts.
The Beginner Mistake: Buying Hardware Before Measuring Loads
Before you buy a solar panel, battery, inverter, or “solar generator,” you need a basic energy budget. That sounds technical, but it is just a list of what you want to power.
Create a table with four columns:
- Device
- Watts while running
- Hours used per day
- Watt-hours per day
Watt-hours are the useful number. If a 10-watt LED light runs for 5 hours, it uses about 50 watt-hours. If a 60-watt laptop charger runs for 3 hours, that is about 180 watt-hours. If a small fridge averages 40 watts across a full day, that is roughly 960 watt-hours per day.
You do not need perfect math at the beginning. You need honest estimates. A plug-in watt meter can help you measure AC appliances. For DC devices, check the label or manual.
A very small starter system might support:
- LED lighting
- Phones, radios, and rechargeable batteries
- Laptop charging
- A router or hotspot
- A small efficient fridge or cooler, if sized carefully
- Occasional small tool charging
It probably should not support:
- Electric space heating
- Electric water heating
- Large air conditioning
- Standard electric ovens
- High-draw power tools for long sessions
Those loads are not impossible. They are just expensive and usually better solved first with efficiency, insulation, alternative fuels, or a larger professionally designed system.
A Simple Starter Formula
For a first system, think in four linked pieces:
- Daily energy use — how many watt-hours you need per day.
- Battery storage — how many hours or days you want backup.
- Solar input — how quickly panels can refill the battery.
- Inverter capacity — what peak AC loads the system can safely handle.
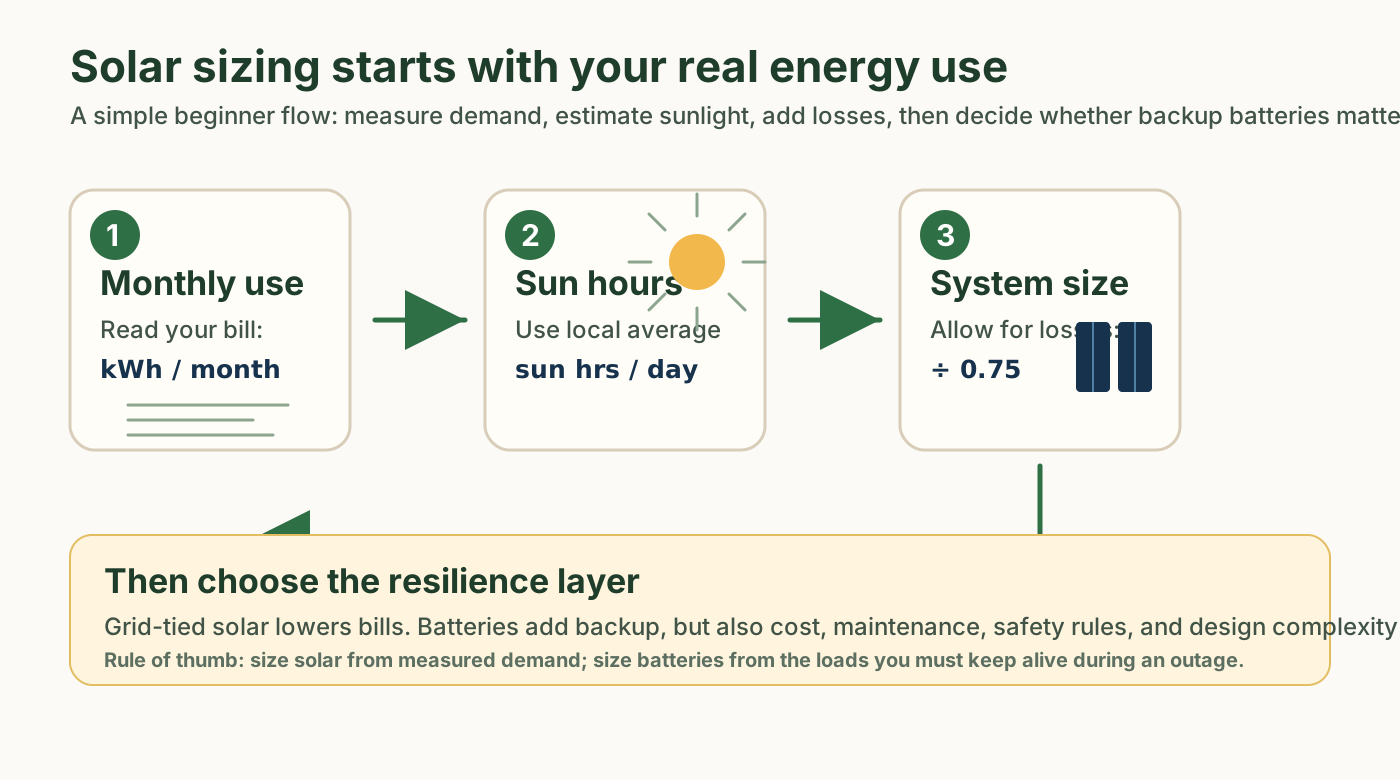
Here is a beginner-friendly way to estimate:
- Add up daily watt-hours.
- Add 20–30% for losses and imperfect conditions.
- Choose battery storage for at least one day of essential use.
- Size solar panels so they can recharge your typical daily use during good sun.
Example: suppose your essential loads total 900 watt-hours per day. Add a buffer and call it 1,200 watt-hours. A 1–2 kWh battery gives you a useful starting point. Solar input might be 300–600 watts of panels depending on location, season, shading, and how quickly you want to recover after cloudy days.
Fact-check flag: exact solar production depends heavily on local peak sun hours, panel angle, shading, season, temperature, and charge controller efficiency. Use a solar calculator or local irradiance data before publishing specific sizing recommendations.
Option 1: portable power station First
For many beginners, a portable power station is the simplest first step. These units combine a battery, inverter, charge controller, display, AC outlets, USB ports, and safety protections in one box.
The advantages are real:
- Easy setup
- Portable
- Fewer wiring decisions
- Built-in monitoring
- Good for renters, apartments, campers, and small cabins
- Lower risk than assembling components without experience
The tradeoffs are also real:
- Less repairable than modular systems
- Expansion can be limited or expensive
- Proprietary cables may lock you into one ecosystem
- The inverter and battery are bundled, so one weak point affects the whole system
A portable power station is a good fit if you want to learn solar behavior without designing a permanent electrical system. It is especially useful for a “resilience corner” at home: phones, lights, radio, laptop, medical device backup where appropriate, and small refrigeration if tested carefully.
Affiliate link suggestion: compare a mid-size LiFePO4 portable power station from brands such as EcoFlow, Bluetti, Anker, or Jackery. Use approved Amazon Associates or direct partner links only after checking current models, battery chemistry, warranty, expansion options, and region availability.
Option 2: Modular Solar Kit
A modular system separates the parts:
- Solar panels
- Mounting hardware
- Charge controller
- Battery bank
- Inverter
- Fuses, breakers, disconnects, and wiring
- Monitoring equipment
This path teaches you more and can be easier to repair or expand. It is also where mistakes become more serious. DC electricity from batteries can deliver very high current. Undersized wires, missing fuses, poor crimps, wrong polarity, or cheap connectors can create fire risks.
If you go modular, start with a low-voltage, clearly documented kit from a reputable supplier, and follow the manual carefully. For anything connected to a home electrical panel, hire a qualified electrician and follow local code.
Safety note: this article is educational, not electrical advice. Permanent wiring, grid interconnection, transfer switches, grounding, and code compliance need qualified review.
Affiliate link suggestion: beginner solar kits from reputable suppliers such as Renogy or similar brands may fit this section. Include only after verifying included components, wire sizing, fusing, battery compatibility, and support reputation.
Battery Chemistry: Why LiFePO4 Is Often the Beginner Favorite
Battery choice shapes the whole system. Lead-acid batteries are familiar and can be cheaper upfront, but they are heavy, have lower usable depth of discharge, and require more care. Lithium iron phosphate batteries, often written as LiFePO4 or LFP, usually cost more upfront but are popular because they offer long cycle life, stable chemistry, lighter weight, and better usable capacity.
For beginners, LiFePO4 often makes sense when the budget allows. Many modern portable power stations use it. Many modular batteries include built-in battery management systems that help protect against overcharge, over-discharge, and temperature problems.
That does not mean all lithium batteries are equal. Check:
- Battery chemistry
- Warranty
- Low-temperature charging protection
- Maximum charge and discharge rates
- Whether batteries can be connected in parallel or series
- Support documentation
- Certifications and real customer support
Fact-check flag: cycle life, usable capacity, low-temperature limits, and safety certifications vary by exact model. Do not publish brand-specific claims without current datasheets.
Inverters: Size for Real Loads, Not Ego
An inverter turns DC battery power into AC power for household-style plugs. Bigger is not automatically better. A larger inverter may cost more, waste more idle power, and encourage loads your system cannot sustain.
For a beginner system, list the AC devices you actually need. Then look at both running watts and surge watts. Motors and compressors can draw extra power at startup. A fridge, pump, or power tool may briefly demand more than its normal rating.
If you only need laptop charging, lights, and small electronics, you may not need a huge inverter. If you want to run refrigeration, tools, or a small pump, you need to check startup surge carefully.
A good beginner rule: design for essential loads first. Luxury loads can come later.
Panels and Placement: Sunlight Beats Fancy Gear
Solar panels are only as useful as the sunlight reaching them. A cheaper panel in full sun can outperform an expensive panel under shade. Before mounting anything, observe your site.
Check:
- Morning shade
- Midday sun
- Afternoon shade
- Seasonal tree shadows
- Roof orientation
- Wind exposure
- Theft or animal risk
- Cable distance to the battery
Portable folding panels are convenient but often cost more per watt. Rigid panels are usually better for permanent installs. Ground mounts can be easier to clean and adjust, while roof mounts save space but require careful waterproofing and safe access.
Practical step: before drilling holes, test panel placement for a week if possible. Watch actual charging performance at different times of day.
The First System I Would Build
For a beginner who wants useful resilience without overcomplication, I would start with this concept:
- A LiFePO4 portable power station or small modular battery around 1–2 kWh
- 300–600 watts of solar input, adjusted for climate and budget
- LED lights on USB or low-voltage DC where possible
- A way to charge phones, radios, and laptops
- A small efficient fridge or cooler only after testing real consumption
- A simple energy log for the first month
This is not a fantasy bunker system. It is a competence-building system. You will learn how weather affects charging, how quickly batteries drain, which appliances are wasteful, and what upgrades actually matter.
What to Upgrade Later
Once the first system works, upgrades become clearer:
- More panels if the battery refills too slowly
- More battery if you run out overnight or during cloudy periods
- A better inverter if peak loads are limiting you
- DC appliances if inverter losses are significant
- Monitoring if you need better data
- A transfer switch or critical-load panel only with qualified electrical help
The smartest upgrades usually come from measured frustration, not shopping excitement.
Maintenance Habits That Keep Systems Alive
Solar systems are quieter than generators, but they are not maintenance-free. Build a monthly habit:
- Check cable connections for looseness or heat damage
- Clean panels if dust, pollen, or bird droppings reduce output
- Keep batteries within recommended temperature ranges
- Review charge/discharge logs
- Test backup loads before emergencies
- Update firmware on portable stations if the manufacturer recommends it
- Store manuals and wiring diagrams in one folder
Also create a “power priority list.” In an outage or cloudy week, decide what gets powered first: communications, lighting, refrigeration, medical equipment if relevant, then comfort.
Final Takeaway
Off-grid solar is not magic, and it is not just shopping. It is a relationship between your habits, your climate, your equipment, and your willingness to measure reality.
Start with essential loads. Buy quality components you understand. Respect electrical safety. Keep the system simple enough that you can troubleshoot it on a tired evening with a flashlight.
If you do that, your first solar setup becomes more than backup power. It becomes a practical step toward self-sufficiency.
Where to go next
If you are building the bigger foundation behind this topic, read The 5 Pillars of Practical Self-Sufficiency, then compare systems in Best First Portable Power Station for Off-Grid Beginners, browse Recommended Gear, or step back to the full beginner roadmap in Start Here. You can also join the newsletter for new guides and tools.
Rent or live in an apartment?
You may not be able to install rooftop solar, but you can still build energy literacy and backup layers. Start with our renter-first plug-in solar checklist before buying balcony panels, portable solar, or batteries.
Related: To size your backup correctly, read Portable Power Station Sizing: Fridge, Router, Lights — What Can You Actually Run?
Affiliate disclosure: some product links in this article may earn SelfSufficient.cloud a commission at no extra cost to you. Recommendations stay practical and trust-first; check current specs, safety requirements, warranty, and local availability before buying.